Backward compatibility for WordPress widget settings

I came across this issue when I had to change a single widget checkbox to a dropdown with multiple options.

One of my plugins has a widget with a checkbox where you can select to display scheduled posts with future dates only.

I wanted to change it to a dropdown where you can also choose posts from the current month, current year etc.

To do this I had to add backward compatibility for the old checkbox setting.

Meaning, if the plugin is updated and the scheduled posts checkbox was selected for a widget, the “posts with future dates only” dropdown option should be selected automatically after the update.

Take a look at this basic widget class with a checkbox.

As you can see there is a checkbox status_future setting in this widget that is needed in all three methods: widget(), update() and form().

In the the updated widget class with a dropdown I’ve replaced the checkbox with a dropdown (with the setting name include_posts), and added a new get_instance_settings() method to apply the backward compatibility to the widget settings.

As you can see, the new method checks if the status_future setting exists and the include_posts setting doesn’t. If that’s the case it creates the new (dropdown) include_posts setting with the old (checkbox) status_future setting value.

This method is called at the top of the widget() and form() methods to apply the backward compatibility before using the widget settings. In the update() method the old status_future setting is removed before updating because it’s not needed anymore.

And that’s how I applied backward compatibility for the settings of my widget. Let me know in the comments if you have any questions or if you ever had to deal with similar issues.

Changing WordPress versions in the Local by Flywheel app

[ Update 2017-11-29: There is now a dedicated script for the Local app available here: https://github.com/keesiemeijer/wp-local-version ]

Local is a free Mac app to develop WordPress locally. The beauty is you can very quickly change the development environment of a site. It enables you to swap between different types of servers and versions of PHP with a single click. The only thing you can’t change (from the user interface) is the WordPress version. This something you don’t do very often, but It got me thinking. I’ve written a script to install older versions of WordPress for VVV. And as it turns out it’s fully compatible with the Local app. It lets you easily change WordPress versions all the way down to 0.71-gold. There are however some simple steps needed to set it up.

Setup

You need to have a site installed and running in the Local app
Click the site in the Local app and see what the Site Path directory is.
Go to /app directory inside the Site Path directory and download the vvv-init.sh file from the WP Nostalgia repository.

curl -O https://raw.githubusercontent.com/keesiemeijer/wp-nostalgia/master/vvv-init.sh

Edit the following variables in the vvv-init.sh file to match the url and credentials of the WordPress site. You can find the database credentials values by clicking Database in the Local App.

# =============================================================================
# Variables
# 
# Note: Don't use spaces around the equal sign when editing variables below.
# =============================================================================

# Domain name
# Note: If edited, you'll need to edit it in the vvv-hosts and the vvv-nginx.conf files as well.
readonly HOME_URL="wp-nostalgia.dev"


# WordPress version to be installed. Default: "0.71-gold"
# See the release archive: https://wordpress.org/download/release-archive/
# 
# Use a version number or "latest"
WP_VERSION="0.71-gold"

# Remove errors. Default true
readonly REMOVE_ERRORS=true

# Database credentials
readonly DB_NAME="wp-nostalgia"
readonly DB_USER="wp"
readonly DB_PASS="wp"

# WordPress credentials
readonly WP_USER="admin"
readonly WP_PASS="password"

That’s it. You can now change WordPress versions very quickly.

Changing WordPress Versions

Warning: Changing WordPress versions with this script completely removes all your files in the site’s public folder and deletes the database before installing a new version.

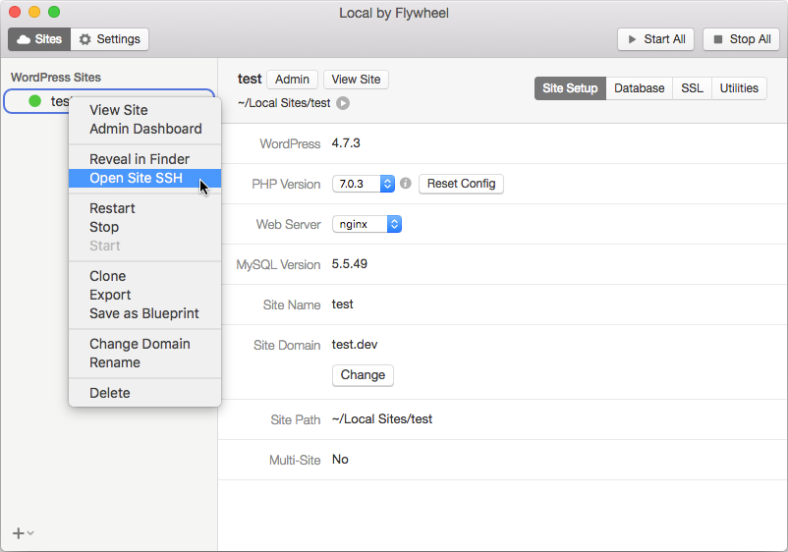
Right click the site and choose Open Site SSH.

A terminal window will open. Go to the app folder by typing this.

cd /app

To install WordPress 4.2 type this

bash vvv-init.sh 4.2

If all went well it shows a message with instructions how to finish the install.

Finished Setup test.dev with version: 4.2!
Visit test.dev/wp-admin Username: admin, Password: password

Change the version number to install any other version found in the WordPress release archive.

Note To install WordPress version 3.8 or lower your site needs to be running PHP 5.3. You can change the PHP version for your site in the Local app.

Add content between HTML paragraphs in WordPress posts

Looking for an automated way to add content, like ads or related posts, after paragraphs (<p></p>) in post content I found none that satisfied my needs completely. Creating a shortcode for this seems like an obvious candidate, but I really don’t like having to manually add shortcodes to content if there are other, more automated, methods available.

One of the solutions out there consists of splitting the content at every closing </p> tag, adding the content, and joining it all back together. Other solutions rely on regular expressions to find the paragraphs, which is known to be very problematic. So, none of the existing methods found really appealed to me. Let me explain why.

HTML, by nature, is a forgiving language that allows poor code to execute and render to varying levels of accuracy. This makes it a very difficult language to parse and manipulate correctly. Another difficulty is that (some) HTML elements are allowed to be nested inside other elements.

Let’s consider this valid HTML, where we want to add content (automatically) after a second paragraph.

<p>First paragraph</p>
<blockquote>
	<p>Second paragraph</p><!-- nested paragraph -->
</blockquote>
<p>Third paragraph</p>
<p>Fourth paragraph</p>

Using the above-mentioned methods the content is inserted after the <p> tag inside the <blockquote>. This is a problem because you probably didn’t want to include an ad (or other content) in your carefully crafted blockquote. Both methods are not context aware, they do not take into account if it’s a nested paragraph or not. This example shows how easily it could create problems, even with valid HTML.

And that’s why I’ve created a plugin to reliably insert content after top-level paragraphs only. It provides you with a function to help you insert content correctly in your (child) theme’s template files.

Click this link to download the plugin WP Insert Content or visit the GitHub repository for more information.

For those who want to know, it uses the PHP DOM module to parse the HTML.

Example

In this example we’re going to add content after the first paragraph in single post pages. The content we’re inserting is a link to a random post.

First activate the WP Insert Content plugin.

Note: It’s recommended you create a child theme first. If you upgrade the theme all our modifications (to insert the link) will be lost.

And put this in your (child) theme’s functions.php file

add_filter( 'the_content', 'insert_random_post_link_between_paragraphs' );

function insert_random_post_link_between_paragraphs( $content ) {

	// Check if the plugin WP Insert Content is activated.
	if ( !function_exists( 'keesiemeijer\Insert_Content\insert_content' ) ) {
		return $content;
	}

	// Check if we're inside the main loop in a single post page.
	if ( !( is_single() && in_the_loop() && is_main_query() ) ) {
		// Nope.
		return $content;
	}

	// Get a random post id.
	$args = array(
		'posts_per_page' => 1,
		'orderby'        => 'rand',
		'post__not_in'   => array( get_the_ID() ),
		'fields'         => 'ids',
	);

	$random_posts = get_posts( $args );

	// Check if a random post id was found.
	if ( isset( $random_posts[0] ) && $random_posts[0] ) {

		// Insert content after first top-level paragraph.
		$args = array(
			'insert_after_p' => 1,
		);

		// Create a link to the random post.
		$insert_content = '<a href=' . get_permalink( $random_posts[0] ) . '>' . get_the_title( $random_posts[0] ) . '</a>';

		// Insert the link after the first paragraph found in post content.
		$content = keesiemeijer\Insert_Content\insert_content( $content, $insert_content, $args );
	}

	return $content;
}

As you can see the plugin function insert_content() is used to add the link after the first paragraph.

		// Insert the link after the first paragraph found in post content.
		$content = keesiemeijer\Insert_Content\insert_content( $content, $insert_content, $args );

For more information about the insert_content() function see this repository that’s included in this plugin.

Develop plugins without restricting yourself to the minimum WordPress requirements

The minimum PHP requirement for WordPress is PHP 5.2.4. This version has been unsupported since early 2011 and is potentially insecure. WordPress supports it to maintain backward compatibility for sites that still use this version.

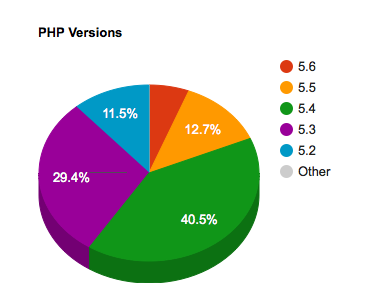
Diagram of PHP version usage for WordPress

PHP versions currently used for WordPress sites

As a WordPress user I’m a big fan of backward compatibility. But as a WordPress plugin developer I don’t want to support PHP 5.2 anymore. There’s so much cool stuff you can use that’s introduced in later versions.

If you set higher PHP requirements for your plugins you’ll have to make sure it fails elegantly in the versions you don’t support. Otherwise it might produce fatal errors. The WPupdatePHP library from @CoenJacobs can help you with that. This library shows an admin notice in case your plugin’s minimum PHP version requirement isn’t met.

Admin notice

Note: I recommend you download the class manually, rename the class with your plugin acronym and put it in your plugin directory. The library itself recommends to install it with composer. My personal opinion is that WordPress isn’t designed to handle 3rd party dependencies with composer.

[UPDATE 2017-06-06] @CoenJacobs has created an excellent way to bundle third-party packages in your plugin with composer. Checkout Mozart

Here’s an example of how to use this library in your root plugin file. In this example the WPUpdatePhp class (from the library) is renamed to MR_Update_Php and included in the ‘includes’ directory

<?php
/**
 * Plugin Name: Minimum Requirement
 * Description: Example plugin to use a minimum requirement of PHP version 5.3
 */

// This file needs to be PHP 5.2 safe!
// No PHP namespaces or other stuff introduced in PHP 5.3 or higher

// We need to require the WPUpdatePhp.php file.
require plugin_dir_path( __FILE__ ) . 'includes/WPUpdatePhp.php';

// Instantiate the renamed class with a minimum required PHP version of 5.3.0.
$updatePhp = new MR_Update_Php( '5.3.0' );

// Check if the current version meets our minimum required PHP version.
if ( $updatePhp->does_it_meet_required_php_version( PHP_VERSION ) ) {

	// Install the plugin

	// Yay! The install.php file doesn't need to be PHP 5.2 safe!
	// All other files in your plugin don't need to be PHP 5.2 safe!
	require plugin_dir_path( __FILE__ ) . 'includes/install.php';
}

That’s it, your plugin works with PHP 5.3 and up! It shows an admin notice for all older versions.

PHPUnit

If you use PHPUnit to test your plugins, you can use the phpVersion and phpVersionOperator attributes in your phpunit.xml configuration file to tell it what PHP versions to use for the tests.

The next example tells PHPUnit to use all php files with the “test-” prefix for the PHP 5.3 and up tests. For the PHP 5.2 and older tests it uses the outdated-php-versions.php file.

<testsuites>
	<testsuite name="My Test Suite">
		<directory phpVersion="5.3.0" phpVersionOperator=">=" prefix="test-" suffix=".php">./tests/</directory>
		<file phpVersion="5.3.0" phpVersionOperator="&lt;">./tests/outdated-php-versions.php</file>
	</testsuite>
</testsuites>

If you need more fine-grained control use the @requires precondition.

Let’s make our WordPress plugins require a more recent version of PHP! The minimum version for WordPress is no longer supported and potentially insecure.

Failing unit tests because of undefined functions

I recently got this error when running PHPUnit tests for one of my plugins.

Fatal error: Call to undefined function is_post_type_viewable() in /srv/www/wordpress-develop/tests/phpunit/includes/utils.php on line 365

After some searching I found out it was because the WordPress test framework used by PHPUnit is from a newer WordPress version as the WordPress version used for the tests. The undefined functions are not found because they don’t exist (yet) in core. The trac ticket dealing with this issue assumes you should only use the WP test framework from the installed branch.

Why does this happen?

For me this scenario caused the fatal error.

I’ve used the WP-CLI command wp scaffold plugin-tests to set up the unit tests for all my plugins. It generates all the files needed for running PHPUnit tests.

In bootstrap.php it tells PHPUnit where to find the WP test framework.

$_tests_dir = getenv( 'WP_TESTS_DIR' );
if ( ! $_tests_dir ) {
	$_tests_dir = '/tmp/wordpress-tests-lib';
}

As you can see it sets the directory for the WP test framework from a environment variable WP_TESTS_DIR if it exists.

For testing locally I use Varying Vagrant Vagrants. This Vagrant configuration sets the WP_TESTS_DIR variable in its bash_profile to /srv/www/wordpress-develop/tests/phpunit/. So it points to the WP test framework from the development branch of WordPress.

Every time you provision VVV it will update the WP test framework to the newest development version. Functions that are not yet in the WordPress versions you test against could be added to it. That’s why these fatal errors will arise in future if you don’t guard against it.

Solution

There are multiple ways to solve this issue.

In the trac ticket it’s suggested you create shims for the non-existent functions. Plugins as EDD and Babble have gone this route. It means you copy and paste the functions from WordPress core in a shims.php file and wrap them in a function_exists. Then include the file in your tests bootstrap.php file so the functions exists when you run the tests.

For me it seems strange to include WordPress core functions in your plugin every time a new function is used in the WP testing framework.

Another solution is to not use the WP_TESTS_DIR environment variable as it can point PHPUnit to a wrong version of the WP testing framework. That’s why I’ve created a pull request for WP-CLI to not use the WP_TESTS_DIR anymore in its plugin scaffolding. Unfortunately it was not approved because of back compatibility. That doesn’t mean I cannot use it for my own plugins though, as I did in this commit. Now the correct version of the WP testing framework is used when running tests. Even Travis CI sees no problem in using this solution.

Download the files from this gist for your own testing environment if you prefer it over adding function shims to your plugins.

Let me know in the comments what solution you use to get rid of these errors.

How to remove specific shortcodes from post content.

With WordPress, some plugins or themes require you to use a shortcode in the post content to add extra functionality. This is not considered a good practice. When the time comes to deactivate such a plugin, its shortcode isn’t removed from the post content. It will still appear in the front end in its unprocessed form. Here’s an example of how that would look like:

[unused_shortcode]

There are many ways to hide unused shortcodes, but none of these methods remove the shortcode from the post content permanently. In other words, they don’t remove the shortcode from the post content in the database. They let it linger there forever.

This got me thinking on how I would tackle this problem. First off, I’ve created a plugin that lets you add shortcodes after post content. But what of all the old posts that still have shortcodes?

WordPress core uses a regular expression (regex) to find the shortcodes in the post content. What better way to find a specific shortcode in the post content as with the same regular expression WordPress core uses.

Retrieving the regular expression

WordPress uses the get_shortcode_regex() function to retrieve its regular expression. This regex finds all registered shortcodes in content. All we have to do to get the regex for a specific shortcode is make the function think there is only one shortcode registered. Our specific shortcode to be precise.

To show how this can be done, the following example prints the regex for the shortcode [related_posts_by_tax] from one of my plugins. For an easier way to get the regex, change the regex produced by this example or use the plugin below.

<?php
// The  $shortcode_tags global variable contains all registered shortcodes.
global $shortcode_tags;

// Store the shortcode_tags global in a temporary variable.
$temp_shortcode_tags = $shortcode_tags;

// Add only one specific shortcode name to the $shortcode_tags global.
//
// Replace 'related_posts_by_tax' with the shortcode you want to get the regex for.
// Don't include the brackets from a shortcode.
$shortcode_tags = array( 'related_posts_by_tax' => '' );

// Create the regex for your shortcode.
$regex = '/' . get_shortcode_regex() . '/s';

// Restore the $shortcode_tags global.
$shortcode_tags = $temp_shortcode_tags;

// Print the regex.
echo $regex;
?>

The code produces this regex (WordPress 4.2.2 install).

/\[(\[?)(related_posts_by_tax)(?![\w-])([^\]\/]*(?:\/(?!\])[^\]\/]*)*?)(?:(\/)\]|\](?:([^\[]*+(?:\[(?!\/\2\])[^\[]*+)*+)\[\/\2\])?)(\]?)/s 

As you can see it’s pretty easy to just change the shortcode name (related_posts_by_tax) in the produced regular expression. But be aware WordPress might change it in future.

Plugin

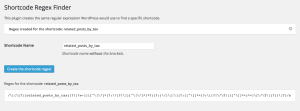
To make it easier for you I’ve created a little plugin to create the regex WordPress would use to find a specific shortcode. Put it in your plugins folder and activate. The settings page is at wp-admin > Settings > Shortcode Regex Finder.

Download it here.

Screen Shot 2015-05-26 at 11.48.50

Using a regular expression to remove a shortcode

I’m using the Search Regex plugin to replace shortcodes inside post content because it has one killer feature. It lets you preview what the regular expression finds before you do the replacing.

This all comes with a warning though. Here it is.

Always make a database backup before bulk replacing stuff in the database with a regular expression! Even if you’re use a plugin! Even if you’re 100% sure nothing bad will happen!

Okay, that should make it clear you need to make a database backup before proceeding 🙂

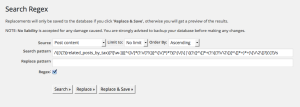
After making a backup, install the Search Regex plugin and go to wp-admin > Tools > Search Regex. Put the regular expression for a shortcode in the “Search pattern” field, check the “Regex” checkbox and click “Search”. Leave the “Replace pattern” field empty if you want to remove the shortcode.

Screen Shot 2015-05-25 at 15.49.09

These are the results for my [related_posts_by_tax] shortcode.

Screen Shot 2015-05-25 at 21.05.27

As you can see, it finds the shortcode in the post content of a post. For this example it only finds one result, but imagine if you inserted a shortcode in thousands of posts. The Search Regex plugin clearly shows what will be replaced in the excellent preview of the results.

If you are happy with the results, replace all instances of the shortcode by clicking “Replace & Save”.

Now it’s time to go over all your posts to see if the unused shortcode was successfully removed. If not, restore your posts with the backup you made.

Consider creating a review for the Search Regex plugin if this helped you out.

If you know of another way of doing the same task, or if you’ve used this approach, let me know in the comments.

Sort posts by multiple meta values or meta keys.

WordPress doesn’t let you sort posts by multiple custom field values or keys if you’re using a meta_query. With a filter in your (child) theme’s functions.php you can order the posts with a new query parameter meta_query_orderby. The new parameter can be used in WP_Query and pre_get_posts. But as always there are some restrictions.

The filter

Put this code in your (child) theme’s functions.php or create a plugin with this code in it.

add_filter( 'query_vars', 'meta_query_orderby_query_vars' );
function meta_query_orderby_query_vars( $qvars ) {
	$qvars[] = 'meta_query_orderby';
	return $qvars;
}

add_filter( 'posts_orderby', 'meta_query_orderby_posts_orderby', 99, 2 );
function meta_query_orderby_posts_orderby( $orderby, $_this ) {
	global $wpdb;

	$meta_query_orderby = $_this->get( 'meta_query_orderby' );
	$sql = '';

	// Check if the query var 'meta_query_orderby' is used for this query.
	if ( !( !empty( $meta_query_orderby ) && is_array( $meta_query_orderby ) ) ) {
		return $orderby;
	}

	// Parse the query vars to retrieve the meta query sql.
	$meta_query = new WP_Meta_Query();
	$meta_query->parse_query_vars( $_this->query_vars );

	if ( !empty( $meta_query->queries ) ) {
		$clauses = $meta_query->get_sql( 'post', $wpdb->posts, 'ID', $_this );
	}

	// Check if the meta query sql where clause was retrieved.
	if ( !( isset( $clauses['where'] ) && $clauses['where'] ) ) {
		return $orderby;
	}

	// Get all sorting arrays custom field keys (keys are required in the sorting arrays).
	$keys = array_values( array_map( 'trim', wp_list_pluck( $meta_query_orderby, 'key' ) ) );

	// Match all meta tables or meta table aliases (wp_postmeta or mt1, mt2 etc..) with meta their meta keys.
	$pattern = "/($wpdb->postmeta|mt\d+)\.meta_key\s*=\s*'(" . implode( '|', $keys ) . ")'/";
	preg_match_all( $pattern  , $clauses['where'], $matches );

	if ( !( isset( $matches[2] ) && $matches[2] ) ) {
		return $orderby;
	}

	// Loop through all sorting arrays.
	foreach ( $meta_query_orderby as $meta ) {

		// Check if the required meta 'key' exists.
		if ( !( isset( $meta['key'] ) && $meta['key'] ) ) {
			continue;
		}

		// Get the numeric key from our matched keys.
		$matched_key = array_search( strtolower( (string) $meta['key'] ), array_map( 'strtolower', $matches[2] ) );

		// Check if matched key exists.
		if ( false === $matched_key ) {
			continue;
		}

		$meta_values = ( isset( $meta['value'] ) ) ? $meta['value'] : array();
		$meta_values = is_array( $meta_values ) ? $meta_values : array( (string) $meta_values );

		if ( isset( $matches[1][ $matched_key ] ) && $matches[1][ $matched_key ] ) {
			if ( !empty( $meta_values  ) ) {
				// Create sql to order by meta value.
				foreach ( (array) $meta_values as $value ) {
					$sql .= $matches[1][ $matched_key ] . ".meta_value = '" . esc_sql( $value ) ."' DESC, " ;
				}
			} else {
				// Create sql to order by meta key.
				$sql .= $matches[1][ $matched_key ] . ".meta_key = '" . esc_sql( $meta['key'] ) ."' DESC, " ;
			}
		}

	}

	return $sql . $orderby;
}

Examples

Example 1

In this example we query for posts with the custom field product_type and order the posts by this (meta value) order.

  1. featured
  2. premium
  3. free

To query for posts with a custom field product_type we usually use something similar to this:

// Query arguments
$args = array(
	'meta_query' => array(
		array(
			'key'   => 'product_type', // Custom field key.
			'value' => array( 'free', 'featured', 'premium' ), // Order of values doesn't matter.
		),
		// Add more meta query arrays here if needed.
	),
);

// The query
$meta_query = new WP_Query( $args );

To sort the posts we add the new parameter meta_query_orderby and make sure the values in the value array are in the correct order. If you don’t use the value array (or leave it empty) you can order the posts by meta key only (see the next example).

// Query arguments
$args = array(
	'meta_query' => array(
		array(
			'key'   => 'product_type', // Custom field key.
			'value' => array( 'free', 'featured', 'premium' ), // Order of values doesn't matter.
		),
		// Add more custom field keys here if needed.
	),
	'meta_query_orderby' => array(

		// Custom field key sorting array.
		array(
			'key'   => 'product_type', // (required) Custom field key.
			'value' => array( 'featured', 'premium', 'free' ), // (optional) Order of values is important!
		),

		// Add more custom field key sorting arrays here if needed.
	),
);

// The query
$meta_query = new WP_Query( $args );

And voila, post will be ordered featured, premium, free

Example 2

In this example we query for posts with the custom fields movie or book And we want the posts with the book custom field to show first. And on top of that we want the the posts with the movie custom field ordered by these values.

  1. action
  2. drama

Here’s the entire query:

// Query arguments
$args = array(

	'meta_query' => array(
		'relation' => 'OR',

		array(
			'key'   => 'movie', // Custom field key.
			'value' => array( 'drama', 'action' ), // Order of values doesn't matter.
		),

		array(
			'key' => 'book', // Custom field key.
		),
	),

	'meta_query_orderby' => array(

		// Sorting array for custom field key
		array(
			'key'   => 'book', // (required) Custom field key.
		),

		// Sorting array for custom field key
		array(
			'key'   => 'movie', // (required) Custom field key.
			'value' => array( 'action', 'drama' ), // (optional) Order of values is important!
		),

	),
);

// The query
$meta_query = new WP_Query( $args );

Disclaimer

I’ve used this meta sorting in a few projects and have only tested it for the use cases there.

One restriction is that the order in the query has to be set to DESC for it to order the posts correctly.

Support

Please don’t post your question here if it doesn’t work. Post it in the WordPress forums and give it a tag: meta query orderby.